Accepting Placements (Linked Patients) Job Aid
New Linked Patient cases are presented to Agencies from an authorizing Payer as Placements. An Agency is free to review the Patient’s case before ultimately deciding whether to accept or reject it.
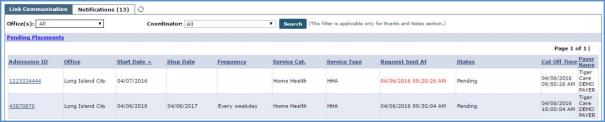
Pending Placements Section
The Pending Placements section in the Home Module contains new Linked Patient cases sent to an Agency from Linked Payers.
All Pending Placements
Each new Placement contains the below-listed components:
-
The Patient’s Admission ID.
-
The Office within the Agency upon assignment.
-
The Start and Stop Date of the case.
-
The Frequency of service.
-
The Service Category (abbreviated as Service Cat.)
-
The Service Type the Patient requires.
-
The Request Sent At time (the time the Payer sent the Placement).
-
The Status of the case (whether it has been accepted or not).
-
The Cut Off Time (the time when the system automatically removes the Placement from the Pending Placement queue).

Case Nearing Cut Off Time
Note: If a Placement is nearing its Cut Off Time, the value in the Request Sent At column is highlighted in red, signifying immediate action is required.
Accepting New Placements
Complete the steps below to accept a Pending Placement.
|
Step |
Action |
|---|---|
|
1 |
Click on the Admission ID link of the Placement.
Placement Admission ID |
|
2 |
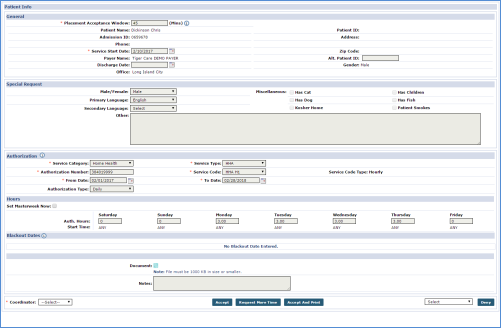
The Patient Info page opens containing Patient details such as demographic information and authorizations. Go to the bottom of the page for the Placement options.
Patient Info Page |
|
3 |
In the Placement section, either Accept or Deny the Placement. To accept, click on the Accept or Accept and Print button. If more time is required, click on the Request More Time button. If accepting, select/assign the Coordinator from the dropdown (required).
If rejecting the Placement, click on the Deny button and select the Reason from the dropdown to the left of the button.
Placement Options |


Once a Placement is accepted or denied, it is cleared from the Pending Placement section.
User Permission
To view and accept placements, users must have permission, enabled on the User Account. Complete the following steps to enable a specific user to view and accept placements.
|
Step |
Action |
|---|---|
|
1 |
Navigate to Admin > User Management > User Search to locate the intended user in the system. |
|
2 |
Once located on the search, click on the Edit link to enable the fields to open the Update User Account page. |
|
3 |
On the Update User Account page, select the Accept Unspecified Office Placements checkbox, as seen in the following image.
Update User Account – Accept Unspecified Office Placements Field |
|
4 |
Click Save. |

Pending Placement Email Alerts
Automatic email alerts can be set up in the system at the Office level. Complete the following steps to set up email alerts.
|
Step |
Action |
|---|---|
|
1 |
Navigate to Admin > Office Setup > Search Office to locate the applicable office. |
|
2 |
Click on the Office Name (link) to open the Edit Office page. |
|
3 |
On the Edit Office page, scroll to find the Automatic Email section. From the list of options, click on the Edit link Request for New Placement option, as seen in the following image.
Email Alert Setup - Request for New Placement |
|
4 |
The Request for New Placement Email Alert window opens. Select the Email checkbox and enter the applicable Email address(es) for intended recipient(s) and select the Active checkbox to activate.
Enter Email Address for Intended Recipients |
| 5 | Click Save to finalize. |

